Resolution auto adjustment is just improved in 0.8.21.5395 to make display aspect ratio conversion more easily without specifiying a target resolution. With these settings, the height of output resolution will be automatically calculated according to specified display aspect ratio and whether to crop or expand the frame.
Read the rest of this entry >>
Category Archive: How-to
Resolution auto adjustment improved (Stanley posted on May 14th, 2013 )
MediaCoder 0.8.15 released with transcoding statistics data visualization (Stanley posted on September 14th, 2012 )
MediaCoder 0.8.15 is just released. A noticeable new feature is the transcoding statistics data visualization. The data set initially includes audio/video bitrate distribution, transcoding speed, and audio/video codecs CPU utilization.
TAGS:statistics
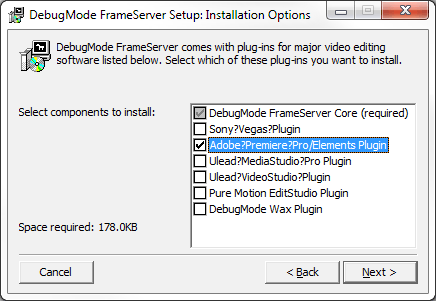
Using Debugmode Frameserver to bridge MediaCoder and Adobe Premiere (Stanley posted on June 18th, 2010 )
We can use Debugmode Frameserver to easily connect Premiere (and some other NLE software) and MediaCoder 0.7.3.4682 (or later version). Video exported from Premiere can be encoded directly with MediaCoder to save time and effort and improving quality.
The following are the brief steps to make it work.
Installing DebugMode Frameserver
Read the rest of this entry >>
TAGS:adobe, debugmode, frameserver, premiere
About the new aspect ratio option in MediaCoder关于MediaCoder新版本中的宽高比设置 (Stanley posted on January 1st, 2010 )

As you might have noticed, the aspect ratio option has been changed. The new option has 4 choices as shown above. Here I explain the feature of each option.
MediaCoder的新版本中,宽高比设置做了改动。现在界面上提供了4种控制宽高比的选择,在此做一下解释说明。
Read the rest of this entry >>
Downloading and Saving a High Quality YouTube video using Firefox 3.5 (mixer posted on November 16th, 2009 )
Introduction
A lot of people want to save YouTube videos, but either find the process frustrating or wind up saving poor quality versions. This will explain two steps to get the best quality and save it to your computer.
Step 1: Changing the standard FLV version to MP4
YouTube for some time has been converting most of its content to higher quality MP4 versions. Although some of the older files don’t look much better, saving this MP4 version will almost always be better than the standard “FLV” or Flash version. Also, one noted improvement is that there will be less audio/video sync issues.
1. Find the YouTube video you want to save
2. At the end of the URL (the line of text in the address bar), add one of the following:
&fmt=18 (That’s the “and” symbol-uppercase 7 followed by fmt=18. This invokes the high quality feed)
&fmt=22 (That’s the “and” symbol-uppercase 7 followed by fmt=22. This invokes the 16:9 widescreen feed if available)
3. Click your “Go” button or press enter to reload the better quality version. To verify that you have the higher quality version, you should be able to see the “HQ” icon appear in the lower right corner of the video playback control area.
Step 2: Saving the higher quality MP4 version
In order to save the high quality version as an MP4, we’ll use a real nice bookmarklet. Note: This bookmarklet will only work with Firefox version 3.0 and above. What the bookmarklet does is place a download icon in the video additional information area. This bookmarklet doesn’t install anything and you can delete it anytime. Here’s how to install and use it.
Bookmarklet that places an “Download as MP4” on YouTube video information panel just below the “embed” area.
1. Right click on Firefox’s bookmarks and select “New Bookmark”
2. Enter a name (YouTube Download for example)
3. Copy and paste the following (below) javascript into the “Location” properties of a bookmark.
4. Click “Add”
5. To use the bookmarklet, find the YouTube video you want to download (invoke or add the HQ comment/line to the URL as needed), then open your bookmarks and click “YouTube Download” (the name you gave it in step #2 above). A icon “Download as MP4” will appear in the video information panel. Right click this icon and select “Save Link As”. Enter a name and then click “Save”.
Javascript for YouTube download MP4 bookmarklet
javascript:if(!document.getElementById(‘download-youtube-video’)){var%20video_id=null;var%20video_hash=null;var%20video_player=document.getElementById(‘movie_player’);if(video_player){var%20flash_variables=video_player.attributes.getNamedItem(‘flashvars’);if(flash_variables){var%20flash_values=flash_variables.value;if(flash_values){var%20video_id_match=flash_values.match(/[^a-z]video_id=([^(\&|$)]*)/);if(video_id_match!=null)video_id=video_id_match[1];var%20video_hash_match=flash_values.match(/[^a-z]t=([^(\&|$)]*)/);if(video_hash_match!=null)video_hash=video_hash_match[1]}}}if(video_id==null||video_hash==null){var%20args=null;try{args=yt.getConfig(‘SWF_ARGS’)}catch(e){}if(args){video_id=args[‘video_id’];video_hash=args[‘t’]}}if(video_id!=null&&video_hash!=null){var%20div_embed=document.getElementById(‘watch-embed-div’);if(div_embed){var%20div_download=document.createElement(‘div’);var%20div_download_code=’%3Cbr%20/%3E%3Cspan%20id=\’download-youtube-video\’%3E%3Ca%20href=\”+’http://www.youtube.com/get_video?fmt=18&video_id=’+video_id+’&t=’+video_hash+’\’%20onclick=\’blur(this);\’%3EDownload%20as%20MP4%3C/a%3E’;try{if(yt.getConfig(‘IS_HD_AVAILABLE’))div_download_code=div_download_code+’%20|%20%3Ca%20href=\”+’http://www.youtube.com/get_video?fmt=22&video_id=’+video_id+’&t=’+video_hash+’\’%20onclick=\’blur(this);\’%3EDownload%20as%20MP4%20HD%3C/a%3E’}catch(e){}div_download.innerHTML=div_download_code+’%3C/span%3E’;div_embed.appendChild(div_download)}}}void(0)
Update: While the above method may still work, I think the easiest way is to use this “Plugin” for Firefox: https://addons.mozilla.org/en-US/firefox/addon/13990 It installs easy and works great.
MediaCoder 0.7.1 released – first free transcoder accelerated with NVIDIA CUDA technology (Stanley posted on June 8th, 2009 )
We are pleased to announce the release of the new version of MediaCoder 0.7.1. In this version, we start to make use of NVIDIA CUDA technology to accelerate H.264 encoding and video filtering.
A new encoder backend of “CUDA encoder” is added which can be chosen active on the Video tab.
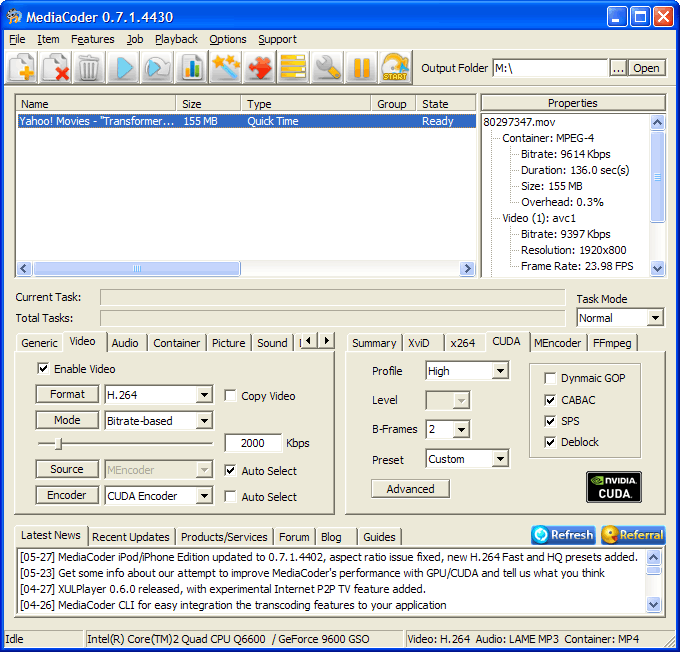
TAGS:accelerate, cuda, H.264