Presets: A way to save your conversion settings ! (mixer posted on February 6th, 2009 )

MediaCoder Presets

What is a preset?

A preset is a copy of your MediaCoder settings for a conversion. They can be saved by clicking “File” and then selecting “Save As Preset”, give the preset a name, and then select a place to save it (destination/path, drive, folder).   A saved preset can then be loaded into MediaCoder. This a a great way to save a particular setup or share it on the MediaCoder forums. Read the rest of this entry >>
Item grouping feature added (Stanley posted on February 3rd, 2009 )

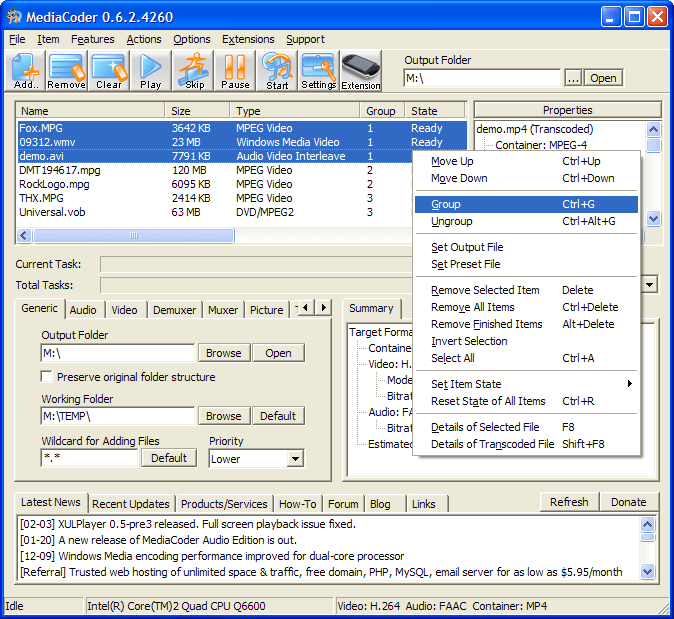
Item grouping feature is added since build 4260. By selecting multiple items in the list and choosing Group from menu (right click an item to pop up), the items will be marked as the same group ID. During processing, they will be joined into one file. The grouping feature also prepares for the upcoming support for multi-track transcoding. The join mode is removed since then.

Item grouping in MediaCoder

Item grouping in MediaCoder

Windows Media encoding performance improved for dual-core processor (Stanley posted on December 9th, 2008 )

Windows Media encoding is proved in the latest build 4224. Previously, when MediaCoder encoding Windows Media with Microsoft Windows Media Format component, audio and video data are encoded and muxed in one thread (despite the possibility that the component may have its multi-threading approach underlying). Now audio and video are encoded in separated threads, and the encoded streams are multiplexed after encoding process. This will eliminate some WMV encoding problem and bring in better encoding performance on dual-core processors as well as better container flexibility. If you experience problems with the new mechansim, please report.

New benchmark mode added (Stanley posted on November 7th, 2008 )

A new task mode, benchmark mode, has been added since build 4210. In this mode, MediaCoder can be used to benchmark your hardware with media transcoding based on the your transcoding settings. During the process, the media content will be transcoded as in normal mode. The difference is there is no file created on hard drive and a benchmark result will be shown on the end of the procedure.

The steps to perform transcoding benchmark are as simple as following:

  1. Add files used for benchmarking
  2. Set up transcoding parameters
  3. Set task mode to “Benchmark”
  4. Click Start button to start benchmarking

Read the rest of this entry >>

TAGS:

The geographic distribution of MediaCoder users (Stanley posted on November 2nd, 2008 )

MediaCoder does not collect or submit any user information, even anonymously. The following statistic data is estimated from the percentage of visitors (data provided by 3rd party Google Analytics and Easy Counter) to the MediaCoder Full Pack download page at http://mediacoder.sourceforge.net/dlfull.htm. This indirectly reflects the current geographic distribution of users (assuming that most people don’t just visit the download page for fun).

Distribution by contintent:

Eastern Asia 24.0%
Northern America 18.8%
Western Europe 16.2%
Eastern Europe 12.1%
Southern Europe 10.1%
Northern Europe 6.3%
South America 5.9%
South-Eastern Asia 3.4%
Oceania 2.1%
Central America 1.1%

Read the rest of this entry >>

TAGS:

How to make MediaCoder work with XULRunner (Stanley posted on October 29th, 2008 )

MediaCoder has some part of its GUI written with XUL which requires Mozilla’s Gecko engine to render. The easiest way to get Gecko is by getting Firefox, which is actually an application built on Gecko engine with XUL. However, as is reported by some users, MediaCoder’s XUL interface is not working as expected in their Firefox. Also some people don’t want to accept Firefox to be installed into their system for some reasons. An alternative to get XUL interface shown is by using XULRunner, the XUL runtime package.

It is exteremely simple to get MediaCoder work with XULRunner. First, download XULRunner and extract the files from the package to some place. Start MediaCoder and go to Options menu and choose Browser setup. Click the “…” button, navgiate to the XULRunner folder and choose xulrunner.exe. Click OK button to confirm and it’s done.

TAGS:,